Magical Galaxies: How to Paint Sparkling Night Skies in Watercolor
Bringing infinite galaxies with twinkling stars to a sheet of white paper: galaxy art is a popular motif in watercolor art. You can easily design wonderful celestial phenomena with just a few colors. They are especially impressive if you use them to fill various silhouettes such as animals or skylines or as a background for black illustrations.
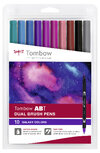
Kathrin-Nina Vinko has selected the ten best ABT Dual Brush Pens, which are now available in a Galaxy Colors Set. You will learn how to use them to draw a galaxy stag in the following video or at your own pace with the step-by-step guide.
Create stars! There are many ways to fill your galaxy with white stars. You can read which ones here.

Materials needed for your galaxy:
- Tombow ABT Dual Brush Pen Galaxy Set
- 407 tiki teal
- 493 reflex blue
- 555 ultramarine
- 636 imperial purple
- 665 purple
- 755 rubine red
- 803 pink punch
- 873 coral
- N15 schwarz
- N55 cool gray 7
- Watercolor paper
- Water brush
- Pencil, such as the MONO 100 H
- Eraser, such as the MONO plastic eraser
- For the stars you will need one of the following:
- White acrylic paint or a white gel pen
- Liquid glue such as MONO Aqua liquid glue
- A glue stick such as the MONO glue pen
- Masking tape
- In the guide I will be using white acrylic paint. If you want to use something else, take a look at this first, so that you do things in the right order.
Do you need more of this?
Step 1: Contours
First of all, you will draw the contours of your stag on the watercolor paper. It is best to use an H pencil for this. These contain less graphite than soft pencils and you will be able to erase it more easily. Make sure not to press too hard, as otherwise you will leave grooves in the paper. If you do not wish to draw the stag freehand you can cut out or trace the template.
Step 2: Priming with ABT Dual Brush Pens
In the next step, you will apply the color directly to the watercolor paper. You do not need to draw the stag too precisely – a few broad strokes will suffice. Sketch in as many patches as you like – starting with lighter colors and adding progressively darker colors as you go. I have started with the ABT-873, gone around it with the ABT-665 and then used the ABT-555 around that. I have added the ABT-493 for individual patches around the edges in order to make the whole piece more interesting.
Once you have filled in the whole template, you can fill in the antlers with the black ABT-N15 and go over the outlines. This will save you from erasing the preliminary sketch.

Step 3: Watercolor
Start to blend the individual colors with each other using the water brush. Start with the lightest color and work towards the darker colors. Be generous with the water. The colors can run into one another.

Step 4: Acrylic paint
Your galaxy creature is almost finished. It’s just missing the twinkling stars. In our step-by-step guide, we will be using white acrylic paint for them. You can find other options below. Take up some acrylic paint with the brush and tap the brush against your finger several times, so that white paint spatters from the brush onto the paper.
![[Translate to Englisch:] 20_10_galaxy_Step4_GIF A watercolour deer motif is created with a mixture of blue, purple and pink tones. A water tank brush blurs the colours for a soft, galaxy-like effect.](/fileadmin/Content/article/2010_galaxy/20_10_galaxy_Step4_GIF.gif)
Salt and rice will absorb the water and colored pigment from your piece, leaving white marks. You use them directly after the watercolor stage. The stars will be larger or smaller depending on how wet your work still is and how large the grains of salt are. Check out at Melanie’s contribution to find out more about using salt and rice for watercolor effects.
Done!
Let us know how helpful this article was for you. If you have any suggestions for improvement or other feedback, we’d love to hear from you. We promise to read everything.
PS: We're also curious to see your results. Share your work with us on Instagram or Facebook and share it with the community.


